Mounting the Windvane
Writing this post in English. Peter Förthmann, founder of Windpilot asked us to provide our mounting instruction. A "how-to" for Norlin 37.
Well, here it is! We're not trying to cover every step, this is to be viewed as complimentary to the manual included in the package. We've tried to add things here that was missing from the included manual or that we found ambigous, or especially hard.
1. We put all we needed on a tarpaulin, to avoid loosing something to the fish.


2. Then we mounted the MF-1 bracket to the original bracket. We needed the MF-1 as our transom is above a certain angle. When ordering, Windpilot will help out will this, we sent them pictures of the boat and they have a database of boats, will ask relevant questions etc, so no problem.
Mount the brackets together was quite simple, as Windpilot (based on the info we had provided) had already at the factory mounted the two parts together with one bolt, based on our requirements, so we just mounted the second bolt and tightened.
3. After that, we had to remove the swimming ladder. Peter recommends putting the windvane centered, so is was necessary.
Before:


After:

4. There was a lot of work to remove the stains and make the transom look nice around the old holes. We covered them in case of rain, as we didn't complete the whole project in one day.

5. We carefully photographed the name of our boat, as we might have to remove the letters and put something similar on the starboard side, as we're going to put the swimming ladder on the port side, by Windpilot's recommendations. While on the topic, we might as well update the font a bit. :)

6. Time to drill new holes.
To countersink, we used the technique learned from the excellent web site:
http://www.pbase.com/mainecruising/rebedding_hardware
Subsequently, the trick was to use a drill with 1 mm lesser diametre than what was needed. Once done, select the correct drill and drill again.
We did a lot of measuring before being able to drill the first hole. The hard part was to hold the windpilot in place, semi-mounted, and find that its lower end is at the correct distance from the water, when at the same time, a giant motorboat is roaring by to upset the water at the floating bridge!
The lower part of the windvane (without the paddle) is supposed to be approx 10 cm above water line (consult manual), and the graded shaft must be perpendicular to the waterline.

Once the first hole was in place, we put a bolt through the brackets and the hole in the stern, loosely tightened the nut from the inside and drilled the remaining three holes, but also by countersinking + smaller drill + regular drill.
The manual states it is not necessary to use backing plates on the inside of the stern, as there won't be any substantial loads (we guess the loads are redirected to rudder movement etc) other than the actual weight of the unit. As that is only around 20 kg, and the fact that our stern is 25 mm thick in single laminate (!) we decided to go without.
As a matter of fact we had mounting plates manufactured, quite large in area and of 5 mm thickness, in stainless steel.

At the time of mounting though, we noticed that the bolts couldn't support also the backing plates, as there would be no space left to put the nuts on the inside! This is probably due to the fact that modern boats typically have half the laminate thickness of certain 70s boats (such as ours). Anyway, with 25 mm laminate and Windpilot's promise that there won't be heavy loads, we were satisfied with the quite large (in diametre) washers provided.
7. When putting stainless bolts and nuts onto the marine grade aluminium which the windvane is mainly constructed from, Windpilot recommended using lanoline. Some parts were already greased with this at delivery. There was mentioned somewhere in the manual (won't swear by it) that another (overkill) method was to use Duralac. Not possible to order in Sweden, and an English dealer wouldn't send it to Sweden. So we ordered a small bottle of similar qualities from http://townshend.se/.

We applied the Tef-Gel on the bolts that go through the bracket and the hull to avoid electrolysis between the steel in the bolts and the aluminium in the bracket.
Between the hull and the bracket on the outside, we applied sikaflex, as recommended by the manual. In fact, there are many varieties of Sikaflex and we took advice from friends and used Casco Marin och Teknik: https://www.bauhaus.se/casco-marin-teknik-vit-300ml.html
This felt ok as it is single laminate and the interior is not a living area of the boat. In most cases I am sceptical to sika-like products, especially when discussed in the context of sandwich-laminate. It is probably better (if sandwich laminate) to make a larger than the hole epoxy plug, drill a narrower hole, mount your hardware with butyl-tape (like what's used when putting cars' windshields in place, and they rarely leak, right?), tighten it more and more over a few days.
While on the subject, never use silicon on a boat, except perhaps around the sink in the galley. Needs mentioning. For the sake of humanity or something... :)
But that's a paranthesis...Back to topic!
In fact there was a large plastic washer between the transom and the bracket, on the outside of the stern.
8. Brackets mounted.

 Heat to make sure it sticks.
9. Time for a break!

10. The windvane with its main body parts fitted, in its folded up position. Makes it possible to have the boat nearer the bridge while working.

11. Now we mounted the red line used to adjust the paddle.


12. Fitting of the wheel adapter.


You had to use a saw to shorten the bolts a bit.

It is detachable:


13. All the lines in place:

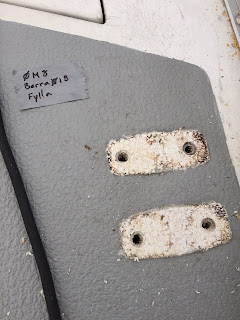
14. Next, we had to fill the old holes of the swimming ladder.
Fortunately, it was single laminate, so no need to make epoxy plugs and
such. We simply filled the holes with thickened epoxy, and made some
small balls of glass-fibre sheets, drenched in epoxy and put in the
holes. We left 1-2 mm to be able to put gelcoat filler on top of it.
We are aware that putting gelcoat on top of epoxy is not best practice (we should have filled the holes with polyester), but "everybody" seems to do it this way. We decided too as well, as we have more experience working with epoxy than polyester, and there is not going be any substantial load on this area. The function of the gelcoat filler is solely estetic.
No images of this step, sorry.
15. To be added: the windvane with paddle and vane mounted.
16. To be added: the windvane in action.
Major things learned from this project:
Things left to do:
We need to improve the finish of the gelcoat filler surface, by grinding it down.
And, most important: either re-mount the old swimming ladder or find a new one. We'd like a telescope model, as the folding models have to be very far out from the windpilot to avoid clashing into it when folding it. And our stern is quite narrow as it is. So far we haven't found anything suitable. If re-mounting we need some welding done to modify it.
Well, here it is! We're not trying to cover every step, this is to be viewed as complimentary to the manual included in the package. We've tried to add things here that was missing from the included manual or that we found ambigous, or especially hard.
1. We put all we needed on a tarpaulin, to avoid loosing something to the fish.


2. Then we mounted the MF-1 bracket to the original bracket. We needed the MF-1 as our transom is above a certain angle. When ordering, Windpilot will help out will this, we sent them pictures of the boat and they have a database of boats, will ask relevant questions etc, so no problem.
Mount the brackets together was quite simple, as Windpilot (based on the info we had provided) had already at the factory mounted the two parts together with one bolt, based on our requirements, so we just mounted the second bolt and tightened.
3. After that, we had to remove the swimming ladder. Peter recommends putting the windvane centered, so is was necessary.
Before:


After:

4. There was a lot of work to remove the stains and make the transom look nice around the old holes. We covered them in case of rain, as we didn't complete the whole project in one day.


6. Time to drill new holes.
To countersink, we used the technique learned from the excellent web site:
http://www.pbase.com/mainecruising/rebedding_hardware
Subsequently, the trick was to use a drill with 1 mm lesser diametre than what was needed. Once done, select the correct drill and drill again.
We did a lot of measuring before being able to drill the first hole. The hard part was to hold the windpilot in place, semi-mounted, and find that its lower end is at the correct distance from the water, when at the same time, a giant motorboat is roaring by to upset the water at the floating bridge!
The lower part of the windvane (without the paddle) is supposed to be approx 10 cm above water line (consult manual), and the graded shaft must be perpendicular to the waterline.

Once the first hole was in place, we put a bolt through the brackets and the hole in the stern, loosely tightened the nut from the inside and drilled the remaining three holes, but also by countersinking + smaller drill + regular drill.
The manual states it is not necessary to use backing plates on the inside of the stern, as there won't be any substantial loads (we guess the loads are redirected to rudder movement etc) other than the actual weight of the unit. As that is only around 20 kg, and the fact that our stern is 25 mm thick in single laminate (!) we decided to go without.
As a matter of fact we had mounting plates manufactured, quite large in area and of 5 mm thickness, in stainless steel.

At the time of mounting though, we noticed that the bolts couldn't support also the backing plates, as there would be no space left to put the nuts on the inside! This is probably due to the fact that modern boats typically have half the laminate thickness of certain 70s boats (such as ours). Anyway, with 25 mm laminate and Windpilot's promise that there won't be heavy loads, we were satisfied with the quite large (in diametre) washers provided.
7. When putting stainless bolts and nuts onto the marine grade aluminium which the windvane is mainly constructed from, Windpilot recommended using lanoline. Some parts were already greased with this at delivery. There was mentioned somewhere in the manual (won't swear by it) that another (overkill) method was to use Duralac. Not possible to order in Sweden, and an English dealer wouldn't send it to Sweden. So we ordered a small bottle of similar qualities from http://townshend.se/.

We applied the Tef-Gel on the bolts that go through the bracket and the hull to avoid electrolysis between the steel in the bolts and the aluminium in the bracket.
Between the hull and the bracket on the outside, we applied sikaflex, as recommended by the manual. In fact, there are many varieties of Sikaflex and we took advice from friends and used Casco Marin och Teknik: https://www.bauhaus.se/casco-marin-teknik-vit-300ml.html
This felt ok as it is single laminate and the interior is not a living area of the boat. In most cases I am sceptical to sika-like products, especially when discussed in the context of sandwich-laminate. It is probably better (if sandwich laminate) to make a larger than the hole epoxy plug, drill a narrower hole, mount your hardware with butyl-tape (like what's used when putting cars' windshields in place, and they rarely leak, right?), tighten it more and more over a few days.
While on the subject, never use silicon on a boat, except perhaps around the sink in the galley. Needs mentioning. For the sake of humanity or something... :)
But that's a paranthesis...Back to topic!
In fact there was a large plastic washer between the transom and the bracket, on the outside of the stern.
8. Brackets mounted.


9. Time for a break!

10. The windvane with its main body parts fitted, in its folded up position. Makes it possible to have the boat nearer the bridge while working.

11. Now we mounted the red line used to adjust the paddle.


12. Fitting of the wheel adapter.


You had to use a saw to shorten the bolts a bit.

It is detachable:


13. All the lines in place:

We are aware that putting gelcoat on top of epoxy is not best practice (we should have filled the holes with polyester), but "everybody" seems to do it this way. We decided too as well, as we have more experience working with epoxy than polyester, and there is not going be any substantial load on this area. The function of the gelcoat filler is solely estetic.
No images of this step, sorry.
15. To be added: the windvane with paddle and vane mounted.
16. To be added: the windvane in action.
Major things learned from this project:
- Think, think, then think again!
- Seriously, it is important to measure things very accurately and think them through. You wouldn't want to drill a hole in the stern in the wrong place, and find that the install will be flawed, have a poor performing unit etc.
- It says in the manual, but needs repeating: always attach tools and the Windvane parts (all! even the tiniest!) to wires or ropes. We lost one tool when taking the lazy approach.
- We found it good to mount with the boat in the water, to find the correct angles. When on the hard, this can prove harder.
Things left to do:
We need to improve the finish of the gelcoat filler surface, by grinding it down.
And, most important: either re-mount the old swimming ladder or find a new one. We'd like a telescope model, as the folding models have to be very far out from the windpilot to avoid clashing into it when folding it. And our stern is quite narrow as it is. So far we haven't found anything suitable. If re-mounting we need some welding done to modify it.

Kommentarer
Skicka en kommentar